COLMAP processes the input images to estimate camera intrinsics and extrinsics. It also generates a sparse point cloud, which serves as the geometric foundation for training a 3D Gaussian Splatting model.
In this tutorial, COLMAP is run directly from the command line to provide full control over feature extraction, matching, and triangulation. This approach allows you to inspect intermediate results and troubleshoot issues more easily.
Why not use the default Nerfstudio pipeline?
The Nerfstudio CLI includes a wrapper for COLMAP through ns-process-data, but it uses default parameters defined in the pipeline’s codebase. These defaults work in many cases but often fail on real-world scenes that require parameter tuning.
For example, when the sample dataset was processed using the default wrapper, COLMAP registered only 2 images out of 84:
Starting with 84 images
Colmap matched 2 images
COLMAP only found poses for 2.38% of the images. This is low.
This can be caused by a variety of reasons, such as poor scene coverage,
blurry images, or large exposure changes.
Nerfstudio recommends increasing image overlap or improving capture quality. While these are valid suggestions, in many cases you can still get usable results by adjusting COLMAP parameters directly.
The following sections walk through the exact command-line steps used to produce a successful reconstruction for this dataset.
COLMAP operations
The COLMAP workflow includes three major stages:
Feature extraction: Detects distinctive visual features (such as SIFT keypoints) in each image.
Feature matching: Finds reliable correspondences between features across image pairs.
Sparse 3D reconstruction: Estimates camera intrinsics and extrinsics and generates a sparse point cloud of the scene.
Although these operations can be performed using the COLMAP GUI, the command-line interface is preferred in this tutorial for two reasons:
It enables fine-tuned parameter control for each stage.
It supports automation for processing multiple datasets.
Data folder structure
Below is an example of the dataset structure expected by COLMAP and gsplat:
Filenames such as image_0001.jpg are for illustration only. Consistent and sequential names are recommended for clarity, but there are no strict naming requirements.
images_2 and images_4 contain 2× and 4× downsampled versions of the original images. These are used with --data_factor 2 or --data_factor 4 during training. Additional folders (such as images_8/) can be added as needed.
sparse/0/ contains the output from COLMAP’s sparse reconstruction. If COLMAP produces more than one disconnected model from the input images, it creates additional subfolders such as sparse/1, sparse/2, and so on.
colmap.db is the database generated during feature extraction and matching. It stores keypoints, matches, and camera intrinsics.
A sample dataset that follows this structure is included in the repository: datasets/plush-dog. It can be used for testing or as a reference when preparing your own scenes.
1 - Run COLMAP with Default Parameters
Warning
This section demonstrates how to run COLMAP using its default parameters. On the sample dataset, this configuration fails to produce a valid reconstruction, though it may work with other datasets.
If you’re only interested in a setup that works with the tutorial dataset, skip ahead to Run COLMAP with Adjusted Parameters.
Set paths and create output folders
First, define the required environment variables and create the output folder:
set COLMAP_PATH=<Path to installed colmap.bat>
set DATA_PATH=<Path to dataset folder, e.g., plush-dog>
set IMAGE_PATH=%DATA_PATH%\images
set DB_PATH=%DATA_PATH%\colmap.db
set SPARSE_PATH=%DATA_PATH%\sparse

mkdir %SPARSE_PATH%
Run feature extraction
Use the following command to extract SIFT features from the input images:
This command performs pairwise feature matching between all image pairs using default settings.
Parameter reference:
--database_path: Path to the COLMAP database with extracted features
--SiftMatching.use_gpu 1: Enables GPU acceleration for matching
The exhaustive matcher compares features between every possible image pair. It is best suited for small to medium-sized datasets (up to a few hundred images). For larger datasets, it becomes computationally expensive because the number of pairs grows quadratically.
COLMAP also supports other matching strategies that are better for large-scale datasets, including sequential, spatial, and vocab tree matching. See the COLMAP documentation for more details.
--database_path: Path to the COLMAP database with features and matches
--image_path: Path to the folder with input images
--output_path: Path to save the reconstructed models. Each result will be stored in a numbered subfolder (for example, sparse/0)
Sample output and failure
In some cases, including the example dataset in this tutorial, COLMAP may not succeed with the default settings. Feature matching might complete, but the reconstruction can fail during the incremental mapping stage.
A sample failure log looks like this:
Loading database
Loading cameras...
 1 in 0.000s
Loading matches...
 214 in 0.001s
Loading images...
 84 in 0.008s (connected 84)
Loading pose priors...
 0 in 0.000s
Building correspondence graph...
 in 0.005s (ignored 0)
Elapsed time: 0.000 [minutes]
Finding good initial image pair
Initializing with image pair #57 and #83
Global bundle adjustment
Registering image #56 (3)
=> Image sees 52 / 299 points
Retriangulation and Global bundle adjustment
Registering image #84 (4)
=> Image sees 68 / 257 points
...
Registering image #43 (21)
=> Image sees 30 / 144 points
=> Could not register, trying another image.
Retriangulation and Global bundle adjustment
Finding good initial image pair
=> No good initial image pair found.
Finding good initial image pair
=> No good initial image pair found.
The repeated message "No good initial image pair found" indicates that COLMAP could not identify a geometrically valid pair of images to start the reconstruction. This can occur during initialization of the first 3D model or when attempting to begin a new model after failing to register additional images.
These failures are typically caused by weak, sparse, or unevenly distributed feature matches across the dataset. To improve initialization, try adjusting feature extraction and matching parameters to increase the quality of initial correspondences.
If tuning parameters is not sufficient, consider capturing more overlapping images or experimenting with alternative reconstruction tools.
This section shows how adjusting COLMAP parameters can improve reconstruction results. The steps for setting paths and creating output folders are the same as in Run COLMAP with Default Parameters and are not repeated here.
Run feature extraction
The feature extraction command remains unchanged from the default configuration. It uses GPU acceleration and assumes a single pinhole camera model:
Compared to the default configuration, this version adds --SiftMatching.guided_matching 1, which enables guided matching. Guided matching applies geometric constraints based on two-view geometry to filter candidate correspondences. This helps reduce outlier matches and improves robustness, especially in scenes with weak textures or limited image overlap.
Sample output:
==============================================================================
Feature matching
==============================================================================
Creating SIFT GPU feature matcher
Generating exhaustive image pairs...
Matching block [1/2, 1/2]
in 1.112s
Matching block [1/2, 2/2]
in 0.435s
Matching block [2/2, 1/2]
in 0.987s
Matching block [2/2, 2/2]
in 0.952s
Elapsed time: 0.059 [minutes]
Loading database
Loading cameras...
 1 in 0.001s
Loading matches...
 213 in 0.001s
Loading images...
 84 in 0.009s (connected 84)
Loading pose priors...
 0 in 0.001s
Building correspondence graph...
 in 0.009s (ignored 0)
Elapsed time: 0.000 [minutes]
Run sparse 3D reconstruction (adjusted parameters)
To improve reconstruction robustness, use the following command with adjusted thresholds:
These parameters relax several of COLMAP’s default thresholds:
--Mapper.init_min_tri_angle 2 (default: 16)
Sets the minimum triangulation angle (in degrees). Lower values allow more points but may reduce accuracy.
--Mapper.init_min_num_inliers 4 (default: 100)
Specifies the minimum number of verified matches needed to initialize the model.
--Mapper.abs_pose_min_num_inliers 3 (default: 30)
Sets the minimum number of 2D–3D correspondences required to register a new image.
--Mapper.abs_pose_max_error 8 (default: 12)
Increases the acceptable reprojection error (in pixels) during registration.
These settings can help reconstruct scenes where default thresholds are too strict. For the sample dataset in this tutorial, these adjustments allowed successful reconstruction. You may need different values for other datasets, depending on image quality and scene structure.
Note: These parameters were chosen specifically for the sample dataset used in this tutorial. They are not intended as general-purpose defaults. You may need to adjust the values based on your scene, image quality, and reconstruction goals.
Sample output
If successful, COLMAP will show incremental image registration:
Finding good initial image pair
Initializing with image pair #20 and #39
Global bundle adjustment
Registering image #19 (3)
=> Image sees 110 / 618 points
Retriangulation and Global bundle adjustment
Registering image #1 (4)
=> Image sees 167 / 689 points
...
There should be no messages such as:
=> No good initial image pair found.
Additionally, the %SPARSE_PATH% folder (typically sparse/) should contain only one subfolder, usually named 0.
If multiple subfolders appear (such as 1 or 2), it means COLMAP reconstructed disconnected 3D scenes. This typically indicates that not all images were successfully registered into a single model.
View the reconstruction in the COLMAP GUI
After reconstruction completes, you can inspect the result in the COLMAP graphical interface:
Launch COLMAP.
Go to File → Import Model.
In the file dialog, navigate to the %SPARSE_PATH%\0 folder (typically sparse/0).
Click Select Folder.
COLMAP will display the sparse point cloud and camera positions.
To improve visibility:
Open Render → Render Options
Adjust Point size and Camera size
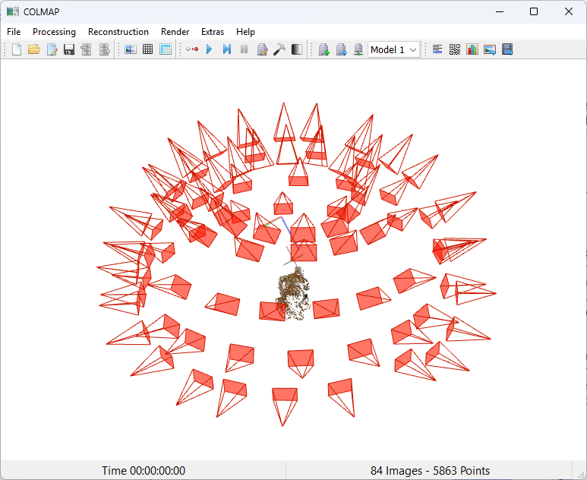
The status bar at the bottom should show a message like:
84 Images - 5863 Points
This means all 84 images were successfully registered, resulting in a sparse reconstruction with 5,863 3D points.
Figure 6. COLMAP GUI displaying the sparse point cloud and camera poses.
Optional: Run the full pipeline using a batch script
You can automate the entire COLMAP pipeline with a batch file. A sample .bat script containing all the commands described above is available at:
scripts/run_colmap_adjusted.bat
Before running the script, make sure to update the paths to match your local setup.
Reference results
The reference COLMAP output, including the sparse point cloud and estimated camera poses, is available in the sample dataset repository: datasets/plush-dog.
Notes on parameter tuning and dataset quality
Note: The parameters used in this tutorial were selected to produce reliable results for the sample dataset. They are not optimized for performance or accuracy and are not intended as general-purpose defaults. For other datasets, you may need to adjust the values based on your reconstruction goals, such as speed, completeness, or visual quality. Finding the right configuration often requires several iterations.
Advanced users can also bypass COLMAP’s internal feature extraction and matching by injecting custom features or correspondences directly into the COLMAP database. This allows you to integrate learned feature pipelines or third-party tools while still using COLMAP for mapping.
In some cases, collecting a more complete or higher-quality dataset is more effective than adjusting reconstruction parameters. However, this is not always possible. For example:
The dataset may be captured in uncontrolled environments
Lighting, texture, or camera settings may not be under your control
The scene may have large textureless areas or reflective surfaces
In such cases, parameter tuning becomes essential to compensate for limitations in the input data.