Run COLMAP with Adjusted Parameters
This section shows how adjusting COLMAP parameters can improve reconstruction results. The steps for setting paths and creating output folders are the same as in Run COLMAP with Default Parameters and are not repeated here.
Run feature extraction
The feature extraction command remains unchanged from the default configuration. It uses GPU acceleration and assumes a single pinhole camera model:
%COLMAP_PATH% feature_extractor ^
    --database_path %DB_PATH% ^
    --image_path %IMAGE_PATH% ^
    --ImageReader.single_camera 1 ^
    --ImageReader.camera_model PINHOLE ^
    --SiftExtraction.use_gpu 1
This command should produce output similar to the default run, confirming that SIFT features were successfully extracted from each image.
Run feature matching (adjusted parameters)
Use the following command to perform feature matching with modified settings:
%COLMAP_PATH% exhaustive_matcher ^
    --database_path %DB_PATH% ^
    --SiftMatching.use_gpu 1 ^
    --SiftMatching.guided_matching 1
Compared to the default configuration, this version adds --SiftMatching.guided_matching 1, which enables guided matching. Guided matching applies geometric constraints based on two-view geometry to filter candidate correspondences. This helps reduce outlier matches and improves robustness, especially in scenes with weak textures or limited image overlap.
Sample output:
==============================================================================
Feature matching
==============================================================================
Creating SIFT GPU feature matcher
Generating exhaustive image pairs...
Matching block [1/2, 1/2]
in 1.112s
Matching block [1/2, 2/2]
in 0.435s
Matching block [2/2, 1/2]
in 0.987s
Matching block [2/2, 2/2]
in 0.952s
Elapsed time: 0.059 [minutes]
Loading database
Loading cameras...
 1 in 0.001s
Loading matches...
 213 in 0.001s
Loading images...
 84 in 0.009s (connected 84)
Loading pose priors...
 0 in 0.001s
Building correspondence graph...
 in 0.009s (ignored 0)
Elapsed time: 0.000 [minutes]
Run sparse 3D reconstruction (adjusted parameters)
To improve reconstruction robustness, use the following command with adjusted thresholds:
%COLMAP_PATH% mapper ^
    --database_path %DB_PATH% ^
    --image_path %IMAGE_PATH% ^
    --output_path %SPARSE_PATH% ^
    --Mapper.init_min_tri_angle 2 ^
    --Mapper.init_min_num_inliers 4 ^
    --Mapper.abs_pose_min_num_inliers 3 ^
    --Mapper.abs_pose_max_error 8
Parameter reference
These parameters relax several of COLMAP’s default thresholds:
-
--Mapper.init_min_tri_angle 2(default: 16) Sets the minimum triangulation angle (in degrees). Lower values allow more points but may reduce accuracy. -
--Mapper.init_min_num_inliers 4(default: 100) Specifies the minimum number of verified matches needed to initialize the model. -
--Mapper.abs_pose_min_num_inliers 3(default: 30) Sets the minimum number of 2D–3D correspondences required to register a new image. -
--Mapper.abs_pose_max_error 8(default: 12) Increases the acceptable reprojection error (in pixels) during registration.
These settings can help reconstruct scenes where default thresholds are too strict. For the sample dataset in this tutorial, these adjustments allowed successful reconstruction. You may need different values for other datasets, depending on image quality and scene structure.
Note: These parameters were chosen specifically for the sample dataset used in this tutorial. They are not intended as general-purpose defaults. You may need to adjust the values based on your scene, image quality, and reconstruction goals.
Sample output
If successful, COLMAP will show incremental image registration:
Finding good initial image pair
Initializing with image pair #20 and #39
Global bundle adjustment
Registering image #19 (3)
=> Image sees 110 / 618 points
Retriangulation and Global bundle adjustment
Registering image #1 (4)
=> Image sees 167 / 689 points
...
There should be no messages such as:
=> No good initial image pair found.
Additionally, the %SPARSE_PATH% folder (typically sparse/) should contain only one subfolder, usually named 0.
If multiple subfolders appear (such as 1 or 2), it means COLMAP reconstructed disconnected 3D scenes. This typically indicates that not all images were successfully registered into a single model.
View the reconstruction in the COLMAP GUI
After reconstruction completes, you can inspect the result in the COLMAP graphical interface:
- Launch COLMAP.
- Go to File → Import Model.
- In the file dialog, navigate to the
%SPARSE_PATH%\0folder (typicallysparse/0). - Click Select Folder.
COLMAP will display the sparse point cloud and camera positions.
To improve visibility:
- Open Render → Render Options
- Adjust Point size and Camera size
The status bar at the bottom should show a message like:
84 Images - 5863 Points
This means all 84 images were successfully registered, resulting in a sparse reconstruction with 5,863 3D points.
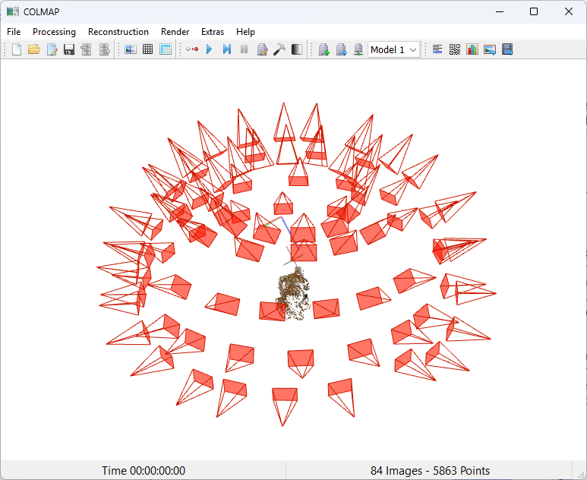
Figure 6. COLMAP GUI displaying the sparse point cloud and camera poses.
Optional: Run the full pipeline using a batch script
You can automate the entire COLMAP pipeline with a batch file. A sample .bat script containing all the commands described above is available at:
scripts/run_colmap_adjusted.bat
Before running the script, make sure to update the paths to match your local setup.
Reference results
The reference COLMAP output, including the sparse point cloud and estimated camera poses, is available in the sample dataset repository: datasets/plush-dog.
Notes on parameter tuning and dataset quality
Note: The parameters used in this tutorial were selected to produce reliable results for the sample dataset. They are not optimized for performance or accuracy and are not intended as general-purpose defaults. For other datasets, you may need to adjust the values based on your reconstruction goals, such as speed, completeness, or visual quality. Finding the right configuration often requires several iterations.
Advanced users can also bypass COLMAP’s internal feature extraction and matching by injecting custom features or correspondences directly into the COLMAP database. This allows you to integrate learned feature pipelines or third-party tools while still using COLMAP for mapping.
In some cases, collecting a more complete or higher-quality dataset is more effective than adjusting reconstruction parameters. However, this is not always possible. For example:
- The dataset may be captured in uncontrolled environments
- Lighting, texture, or camera settings may not be under your control
- The scene may have large textureless areas or reflective surfaces
In such cases, parameter tuning becomes essential to compensate for limitations in the input data.