This tutorial was developed and tested on Windows 11. Most steps also work on Linux, with some differences that will be addressed in a separate guide.
Recommended environment
For efficient training and reproducibility, use a system with the following configuration:
Hardware
NVIDIA GPU with CUDA support
Software
Windows 11
Git
Miniconda or Anaconda
Microsoft Build Tools for Visual Studio 2022
Python 3.10
CUDA Toolkit 12.6 or a compatible version (install separately)
COLMAP (with CUDA support)
gsplat
SuperSplat
Note: Minor differences in software versions or CUDA drivers may require small adjustments.
Note: The CUDA Toolkit must be installed separately from the GPU driver to enable GPU acceleration. Without it, tools like PyTorch will not detect CUDA support. For instructions and compatibility details, see the CUDA Toolkit documentation.
Tested setup
This tutorial was verified using the following configuration:
Extract the contents of the ZIP file to a convenient location, such as:
C:\Tools\colmap
This tutorial uses <COLMAP_PATH> as a placeholder for the COLMAP installation path. Replace it with the actual path you used.
Launch COLMAP
You can start the COLMAP GUI using either of the following methods:
Option A
Double-click COLMAP.bat in the extracted folder.
Option B
Open Command Prompt and run:
<COLMAP_PATH>\COLMAP.bat gui
Replace <COLMAP_PATH> with the actual installation path.
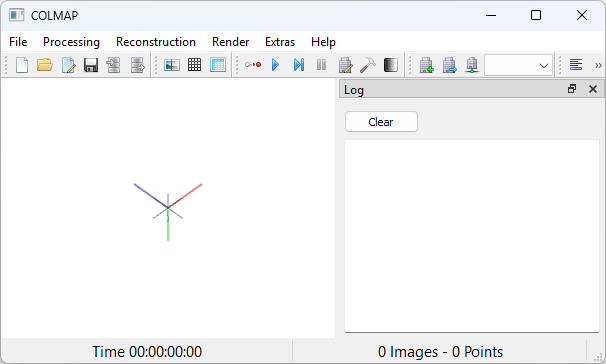
Verify the installation
If installed correctly, the COLMAP GUI should open without errors. You should see the main window, as shown below:
Figure 3. COLMAP GUI main window on startup.
Alternative installation methods
This tutorial uses the precompiled Windows release. For other options, including building from source or using package managers on Linux or macOS, refer to the official guide:
https://colmap.github.io/install.html
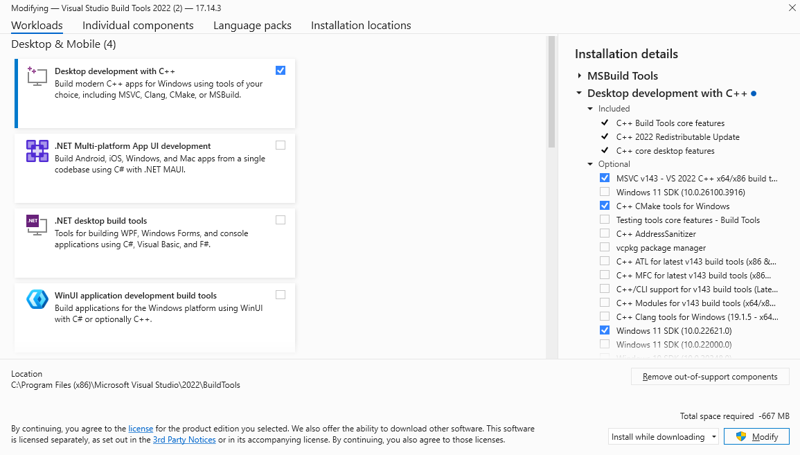
2 - Installing Microsoft Build Tools
The Microsoft Build Tools for Visual Studio provide the C++ compiler and related tools required to build C++ projects on Windows. This setup is necessary to compile gsplat from source.
If the compiler is configured correctly, you will see the same output as in the previous option.
3 - Installing gsplat and Preparing for Training
Verify that CUDA Toolkit is installed
Before installing PyTorch or building gsplat, verify that the CUDA Toolkit is installed and accessible. In Command Prompt, run:
nvcc --version
If installed correctly, you should see output similar to:
nvcc: NVIDIA (R) Cuda compiler driver
Copyright (c) 2005-2024 NVIDIA Corporation
Built on Fri_Jun_14_16:44:19_Pacific_Daylight_Time_2024
Cuda compilation tools, release 12.6, V12.6.20
Build cuda_12.6.r12.6/compiler.34431801_0
If the command is not recognized or no version is shown, install the CUDA Toolkit from the NVIDIA website. Older versions are available from the CUDA Toolkit archive.
Open a developer-enabled terminal
To build gsplat, use a terminal with the Visual C++ environment initialized.
Replace <DATA_PATH> and <OUTPUT_PATH> with valid paths. If everything is set up correctly, the script should start and display a training progress bar.
Known issue on Windows: pycolmap binary parsing error
On Windows, you might encounter the following error when running the training script:
Error with pycolmap:
...
num\_cameras = struct.unpack('L', f.read(8))\[0]
This error is caused by mismatched struct unpacking logic in the Windows version. As of this writing, the fix has not yet been merged into the official pycolmap repository. For details, see the related pull request: https://github.com/rmbrualla/pycolmap/pull/2
To work around the issue, uninstall the original package and install a patched version from a community fork: